2. Preparing for the Installation
Once you have selected and
purchased all the hardware and software that you need to build your
network, you can begin assembling the pieces and collecting the
information you need to perform the Windows SBS 2011 installation.
2.1. Physical Security
Selecting
a secure location for your network components is an important first
step in the deployment process. You must choose a location that protects
your servers, routers, and switches from theft, damage (accidental or
otherwise), excessive heat and moisture, electromagnetic interference,
airborne dust and fumes, and other extreme environmental conditions. You
should also have a clean source of power for your equipment, which, in
the case of your server, means an uninterruptible power supply (UPS) that both conditions the power and provides battery backup in case of a power outage.
Tip:
BEST PRACTICES UPS
devices are available in three types: offline, line interactive, and
online. Both offline and line interactive devices perform a brief
transition when a power failure occurs, while online UPSs do not because
they always supply the computer with power from the continuously
replenishing battery. Therefore, even though it is more expensive, an
online UPS is preferable for your servers.
When it comes to physical
security, wireless access points are a special case for several
reasons. First, while the wireless radio signals can penetrate walls and
other barriers, they are susceptible to attenuation,
meaning that the signals weaken when they have to pass through too many
barriers or barriers that are too dense. If the signal between a
computer and the access point becomes sufficiently weak, the system
might have to drop down to a slower transmission speed or even lose the
connection entirely. Second, there is the danger of outside intrusion
occurring when you place the access point too close to an outside wall.
Choosing a central location within your building can help prevent
unauthorized users in the parking lot from connecting to your network.
2.2. Connecting Your Router
If you are using a shared broadband Internet connection for your network,
you should consider setting up the connection and your router before
you install your server running Windows SBS 2011. It is not absolutely
necessary, but there are multiple benefits to doing so. During the
installation, the Windows SBS 2011 setup program attempts to detect a
UPnP router on the network by transmitting a variety of discovery
messages and listening for replies. If the server locates a router and
can access the Internet through that router, it proceeds as follows:
The server
configures its own TCP/IP client with a static IP address on the same
subnet as the router and with the router’s IP address as its Default
Gateway address.
With
the installer’s permission, the server downloads the latest operating
system updates from Microsoft’s website and installs them during the
installation process.
After the Windows SBS 2011
installation, when you run the Connect To The Internet Wizard, if the
server detects an operational DHCP server on the router, the server
configures its own DHCP server to distribute IP addresses on the same
subnet as the router and then disables the router’s DHCP server.
If the server fails to detect
a router on the network during the Windows SBS 2011 installation, it
configures its own TCP/IP client with the static IP address 192.168.0.2
and no default gateway address. The server still installs the DHCP
Server role during the installation, but it does not configure or
activate the DHCP Server service. After the installation is completed,
you must configure the DHCP Server on the router or the server manually
if you want to dynamically allocate IP addresses to your network
clients.
The procedures for installing your broadband
Internet connection and your router vary depending on your ISP and
router manufacturer. However, in most cases, you must perform the
following basic steps:
Connect
the broadband modem to a power source and to the jack providing access
to the ISP’s network, using the appropriate cable.
Connect
the router to a power source and then to the modem using an Ethernet
cable. In most cases, the router automatically obtains an IP address and
other settings from a DHCP server on the ISP’s network.
If
you are using a separate switch, connect it to a power source and then
connect both the router and a computer running Windows to the switch
using Ethernet cables. If your router has switched ports or an
integrated wireless access point, you can also connect the computer
directly to the router.
On
the computer, start a web browser and connect to the router’s
administrative interface using the default IP address supplied by the
router manufacturer.
Configure
the router to access the Internet by applying the settings supplied by
your ISP. These settings typically consist of a user name and password
and might include other parameters as well.
Once the computer can access the Internet through the router, you can connect your server to a power source and to your new network. At this point, the hardware is ready for the Windows SBS 2011 installation.
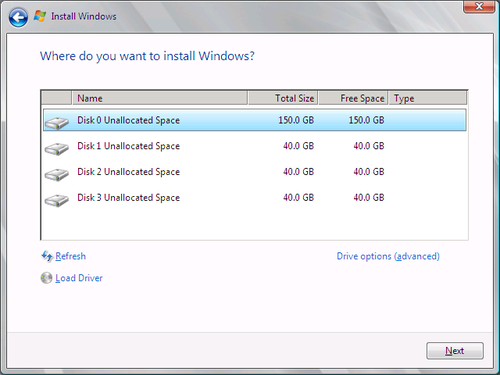
2.3. Provisioning Disk Space
Early in the Windows SBS 2011
installation process, you must specify the hard disk on which you want
to install the Windows Server 2008 R2 operating system and other
software products. Using the interface from the Windows SBS 2011 setup
program shown in Figure 2,
you can select an entire unallocated disk on the computer or create a
new volume using part of the unallocated space on a disk. Before you
actually perform this task, you should consider how you are going to use
the disk space on your server so that you can create the appropriate volumes.
During
the Windows SBS 2011 installation, you can create only simple volumes
on your server disks; you cannot create striped, spanned, or RAID-5
volumes. Therefore, if you are planning to use these volume types for
your user data or other purposes, you must create them using the Disk Management snap-in for the Microsoft Management Console (MMC), after the installation is completed.
For the purposes of the installation, you must decide which hard disk you want to use for the system volume (that is, the volume on which the operating system is installed) and how much disk
space you want to use to create that volume. The Windows SBS 2011 system requirements call for a minimum of
120 GB, but you might want to allocate more disk space. As a general
rule, you should avoid storing documents and other user data on the
system volume. You can create a separate volume for data either during
or after the installation.
In addition to the Windows
Server 2008 R2 operating system itself, Windows SBS 2011 creates the
Exchange Server email stores on the system volume and stores its library
of Windows Server Update Services (WSUS) updates there. Depending on
how many users you have on your network and how they use email, the
Exchange Server stores might grow to consume a great deal of disk space,
especially if the users do not delete their old emails. The WSUS
library also gets larger over time. Fortunately, however, Windows SBS
2011 includes tools that enable you to move the Exchange Server store
and WSUS library to another volume easily. Therefore, you do not have to
account for these in the size you select for your system volume as long
as you have another volume in which you can store them.
2.4. Selecting Names
During the installation
process, the Windows SBS 2011 setup program prompts you to supply names
for your server, for your internal domain, and for an administrative
user. The program suggests server and domain names based on the company
name you supplied earlier, but you might want to change them. Computer
names and domain names cannot be more than 15 characters long and can
consist only of letters, numbers, and the underscore and hyphen
characters. These names are not case-sensitive.
Warning:
Consider the server and domain names that you choose carefully because you cannot change them once the installation is complete.
2.4.1. Computer Naming
The best practice, when selecting a name for your server and for all your network computers,
is to choose consistent, logical names that make sense to all the
network’s users. Remember, there will be many times in the future when
people need to know the names of specific computers, and unless you want
to receive a phone call every time that happens, you want to avoid
using whimsical or nonsensical names. You should avoid using people’s
names for computers as well because it only causes confusion when
employees change jobs or leave the organization.
On a small-business network that has only a few servers, simple names
such as SERVERA or SERVER1 are appropriate, as are names reflecting
each server’s primary role, such as SVR-DC for your domain controller
and SVR-FILE for your file server. For workstations, generic names such
as WKSTN-01 and WKSTN-02 are suitable, but you might also consider names
that reflect the locations of the computers, such as WK-RECEP for the
system on the receptionist’s desk and WK-BKPG1 and WK-BKPG2 for the
computers in the bookkeepers’ office. Whatever conventions you elect to
use, create a set of naming rules and use them consistently for all your computers.
2.4.2. Domain Naming
The domain name that you supply is the name that the setup program assigns to your AD DS domain, appended with the suffix local.
You do not have to register the name that you choose for use on the
Internet. Indeed, this domain cannot be Internet-accessible because local is not an official top-level domain. However, if you have a registered Internet domain name, such as adatum.com, you can elect to use the same second-level name on your internal domain, as in adatum.local, if you want to.
It is possible to use a suffix other than local
for your internal domain name, but to do so you must install Windows
SBS 2011 using an answer file. In fact, if you are connecting Apple
Macintosh computers running OS X version 10.3 or higher to your network,
you must use a different suffix because OS X uses the local suffix for its Rendezvous service. An answer file
is an Extensible Markup Language (XML) file you create that automates
the installation process by supplying responses to the setup program’s
user prompts. The file also enables you to configure additional
installation parameters that do not appear during an interactive
installation or trigger a server migration.
If you intend to use an internal domain name with a suffix other than local,
you should be careful not to use a domain name that someone else has
already registered for Internet use. Your internal use of the domain
name does not affect the legal registrant’s rights, but it does prevent
users on your internal network from accessing that name on the Internet.
Internal domain names
typically use some permutation of the organization’s name. For example,
the A. Datum Corporation might use adatum.local
for its internal domain. Once you decide on a name for your internal
domain, you might want to consider registering that name on the
Internet, in the .com, .net, or .org top-level domain. Even if you do
not need an Internet domain name right now, registering it prevents
anyone else from taking it.
2.4.3. User Naming
After you supply your server and internal domain names, the setup program prompts you to create a network
administrator account. For security reasons, the setup program disables
the operating system’s built-in Administrator account at the end of the
installation, so you must create an account to use in its place. Before
you do this, you might want to consider a user naming convention for
your network as well. A common convention for smaller networks is to
create account names from the user’s first name and last initial, as in
MarkL. For larger networks, where there is more likely to be a name
conflict, you might want to use the first initial and surname, as in
MLee.
Instituting a user-naming
convention for your network is not essential. It is certainly less
necessary than a computer-naming convention, but letting users select
their own account names only increases the burden on the network
administrator. When an administrator knows what a user’s account name
should be without having to ask, the account maintenance process runs
more smoothly for everyone involved.